
How to use anaconda python effectively
In this article, I will talk about effective use of the Anaconda python distribution and all the tools that come with it. I will use a few commands and post screenshots for demonstration purposes, these will be from my Ubuntu machine. All ideas and methods described in this article are also valid on Windows and macOS.
The python programming language is open source software and it’s license allows redistribution of the software by anyone. This means that when you install python, you must pick a specific distribution that you want to install. A commonly used distribution of python is Anaconda. Anaconda bundles together a version of python, a package manager, and environment manager and over 1500 python packages.
If you have not yet installed Anaconda, you can do so from the Anaconda website. If you do not want to install the 1500 packages that you might not need, you can install Miniconda. Miniconda is faster to download and it is easy to install the additional packages once they’re needed. From now on I will use Anaconda to refer to both Anaconda and Miniconda (I have Miniconda on my machine).
Conda environments
A conda environment is a location on your computer managed by the conda package manager.
For all practical purposes, a conda environment is two things:
- A directory on your computer where software can be installed without conflicting with other installed software.
- An activation step, which simply tells your terminal to search for software installed in that directory before searching anywhere else.
The environment directory
Let’s explore this in a bit more detail. Assuming conda is installed (e.g through Anaconda) and available from the command line, run the command:
conda info --envs
You will see a list of conda environments available. If you have not created any environments yourself, you will simply see the “base” environment.

I have two environments, “base” and “standard”. Let’s create another one that called “experiment”. You can do that by running:
conda create -n experiment
Now I have three environments:
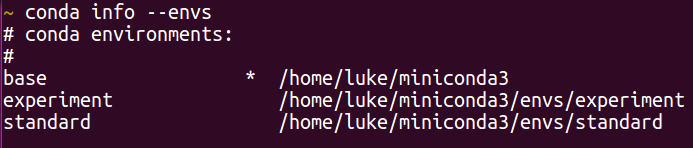
As you can see, next to the environment name is the location of that environment. Conda will use this location for everything we install in this environment. Remember, the first thing I said you needed to understand about a conda environment is that it’s a simple directory. Navigate to that location, you will see everything that the environment contains. If you installed conda through Miniconda, your environment will be empty except for a “conda-meta” directory. If you installed through Anaconda, your environment will be full of things like /bin, /lib etc.
For those using Miniconda, your environment is pretty useless. Let’s install a few things in it. If you’re using Anaconda, you already have everything we’re going to install. Going through the process will be interesting nonetheless as it will help you understand how conda manages it’s environments. Now let’s install a package.
The activation step
But wait… how does conda know in which environment it should install the packages? Should it use “base” or “experiment”? This is where the second important part of the conda environments comes into play: the activation step. For an environment to be useful, your terminal has to know it exists, it has to be “activated”. Essentially, the activation step is the task of prepending the location of the environment onto the PATH environment variable so that the terminal will start by searching there, when looking for software. Activation is done with:
conda activate name_of_environment
The following screenshot shows how activating the experiment environment prepended it’s location to the PATH environment variable. You can also see how conda modified the command line by adding “(experiment)”. This is conda’s way of letting us know that this environment is now activated.
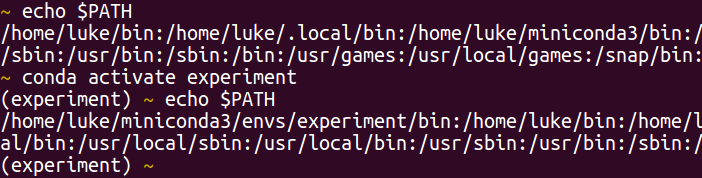
Now that the environment is activated, conda knows which environment to use.
Package management with conda
Let’s install python. To do this, run the following command in your activated environment:
conda install python
You’ll see that your environment directory is no longer empty. For instance, it contains a /bin and /lib directory for executable programs and libraries respectively. For any Linux user, this will sound familiar. Conda is essentially creating a directory structure similar to the root directory which makes sense because it’s building an isolated environment.
Installing python has also installed pip, which is the python package manager. Anaconda will generally recommend using “conda install” when installing packages within a conda environment. I have found that a combination of “pip install” and conda commands can be an extremely powerful tool. Additionally, pip installation might be the only choice available when installing personal packages or packages not available through “conda install”.
Python package management with pip
That’s it for a basic description of the internals of conda environments. However, I would like to go a bit deeper. I would like to explore the use of pip to install python packages within a conda environment as this will be very useful for your python development.
To demonstrate this, we will install Numpy which is a very useful python package for manipulating arrays of data.
First we need to understand a tiny bit about how pip installs python packages. If you search for your python directory under the /lib directory of your conda environment you will see where the python is installed (e.g mine is called “lib/python3.7”). In that directory, you will find a directory called “site-packages”. This is where pip puts the python packages it installs.
If you installed Anaconda, Numpy will already be in there. If you installed Miniconda it won’t.
We’re going to use pip to install, and similarly to before we have the question: how does pip know to install into the python site-packages of the correct environment? When we installed python into our environment, pip was installed into that environment as well and is now available in it’s /bin directory. Since the environment is activated, and the environment location was added to the PATH environment variable, the first pip found by the terminal is the one in that directory. Pip will therefore install numpy in the python installed in that environment. In Ubuntu (and macOS), you can check the correct pip is found by running (in Windows a similar command is “where”):
which pip
Now, let’s run:
pip install numpy
If you look into the site-packages, Numpy we be installed.
Conclusion
Conda environments provide a great way of installing multiple versions of the same software (e.g python) on a single computer without the risk of conflicts. Hopefully this small article has given you practical information on how conda environments work. This should help you use conda more effectively in the future, especially for python development. I have not explored all the things you can do with conda, if you want more information, this documentation is excellent.
This article is part of a series on Python development fundamentals.
I hope you enjoyed the article. Have a great day.